Two Candidates That Will Not Get My Vote (nor that of Dave Ramsey). And it has nothing to do with politics. 7/16/15

I have long considered myself to be socially liberal and fiscally conservative (personally and politically). Personally, that means you live within your means and save up for the big stuff (cars, kids’ education, retirement). Politically, that means you pay for whatever government you want. You’re a small government conservative? Fine! Set taxes accordingly. You’re a big government liberal? Ditto! Make sure that current taxes cover current expenditures and capital expenditures are covered appropriately. If you sell off your toll highways to pay off a short term deficit, congratulations. You just took out a payday loan on the back of your taxpayers. With that as preamble, let us consider two case studies in fiscal liberals. Or, as Dave Ramsey would put it, freakin’ morons.
 
Ladies and Germs, I give you two candidates who could never get my vote.
 
On my right, let’s give a big hello to Marco Rubio. Republicans will regularly warn you that Social Security is a giant Ponzi scheme. Hence, you should prepare for funding your own retirement. I heartily agree with the latter portion of this and have socked away for retirement ever since I started making decent money in 2001. As Dave Ramsey says, live like nobody else now so that you can live like nobody else later. So, what did Senator Rubio do when he faced some cash flow problems. He cashed out his retirement funds! That’s roughly like borrowing money at 35% interest (10% penalty plus your tax rate). And what emergency did he face? Tell us, Marco:
 
“We wanted to have access to cash in the coming year both because I’m running for president but also my refrigerator broke down. That was $3,000. And I had to replace the air conditioning unit in our home,” the Florida Republican said on “Fox News Sunday.”
 
I hope you liked that fridge, Marco, because it just cost you $5000 ($5000 – 10% = $4500 * 2/3 = $3000). Senator Rubio evidently has no idea how to fill out a budget. I do sympathize, having just needed to replace our refrigerator (that we bought new when remodeling). As a fiscal conservative, I checked out the Fourth of July sales and picked up a very nice Samsung for a hair under $1,000 (with French doors no less). That $68,000 IRA that he cashed out probably would have grown to about $750,000 when he retired. But, hey, he’ll have a little mad money on the campaign trail.
 
To my left, a big round of applause for Martin O’Malley. What was his financial sin, you ask? He borrowed over $300,000 so his daughter could go to Georgetown. He utterly failed to save anything for his kids’ college education. When little snookums wanted to go to Georgetown like Grandpa, did he say, “Sorry baby girl, but we have an excellent university in College Park”? No! He went down to the bank and signed on the dotted line. And then he makes a campaign issue of student debt. Here’s a thought, Martin. If you can’t afford it, don’t buy it. I’d love to be tooling down the road in a Tesla right now. I don’t have the scratch, so I’ve got a 10 year old RAV4 (after our 15 year old Solara finally gave up the ghost).
 
Both Rubio and O’Malley are high earners and I’m sure will be able to make up the difference. However, for making two of the worst financial errors you possibly can, they’re dead to me. If you can’t be trusted with your own money, I’m sure as hell not going to trust you to be a responsible steward of my taxes.
 
BB

Health Insurance Freedom

I posed a question up on Plum Line today and got some interesting responses. I think NoVA and jnc were active on the thread. We’ll make it a two parter. I thought Brent, Kevin or Mark might be interested.

1. Your employer pays for your family’s health insurance at a cost of $12,000 per year. Said employer offers to drop the coverage and increase your salary by the same amount. Under current law, you lose the tax benefit of deductibility, but gain the liberty to purchase whatever insurance you like. Is it worth the price?

2. Same as scenario #1, but assume that current law is changed to make health insurance deductible on Schedule A. That or make employer provided health insurance taxable.

—–

I was effectively asked the first question when negotiating terms for a possible new position. I responded that I would have to purchase health insurance of some kind as my better half is a freelancer. The offer included health insurance. I’d take it that way as I don’t care for the tax hit.

I’d say yes to Question #2 as I dislike the link between health insurance and employment. It’s a relic of wage and price controls from the 40s. The U.S. spends as many public dollars as most developed countries do and then kicks in a few more precent of GDP.

BB

Bites & Pieces: The Goose Got Loose (Mexican Birria)

Hi all,

The Goose got loose on Friday and came down here for dinner. I decided to ask her for her favorite protein (beef or lamb), starch (rice), and veg (tomato or cuke this time of year). The selections seemed to cry out for a curry. Rogan Josh with basmati rice, a masala tomato salad and a nice raita would do the trick. Then I got to researching an upcoming trip to San Diego. I had this great dish and watned to try it again, but couldn’t remember what it was called. I wound up using Urban spoon and searching on Mexican restaurants in Chula Vista. Bingo! I saw a place called Birrieria Don Rafa, checked out its address and knew I had found it.

What is Birria? It’s a stew (thank you, Hank Azaria). It’s related to molé in that one makes a paste from rehydrated chiles. Instead of ladling a bit of molé sauce onto the meat, one braises the meat in the sauce until it breaks down. Beef, goat or lamb are all traditional. So I shifted the menu to south of the border. Cook some black beans, some nice yellow rice, and prepare a cucumber/tomato salsa. And, of course, birria.

So, now that I knew what I wanted to make, the question was how to do it. After looking through various recipes, I combined a couple. There’s a cooking and life blog called the Almost Fearless Kitchen. I liked her method and explanation. I also checked out recipes from a favorite source, Pati Jinich. She used to have a show on WETA called Pati’s Mexican kitchen. Turns out that she doesn’t have a recipe for birria, but her barbacoa recipe appealed to me. So, I combined aspects of the two recipes. I promised Goose to get her my “recipe” (hah!), so I thought I’d post it here as well. I want to make this again, so writing it down is useful to me as well.

Both recipes had aspects that I liked. Almost Fearless had a nice explanation for using several different peppers. Building layers of flavor and all that. I liked the additional liquid in Pati’s approach and didn’t feel a need to strain the paste. Just add additional liquid and let it all rock. I wound up over-salting the dish a bit, but the Goose likes her salt. As I couldn’t take the day off, I got up early to prep the sauce, brown the meat and toss everything in the slow cooker.

http://kitchen.almostfearless.com/birria-the-mexican-stew-that-cures-anything/

http://www.patismexicantable.com/2012/02/lamb_barbacoa_in_adobo/

Almost Patti’s Birria

Ingredients

Carne: 4 pounds of meat (see notes)
Chiles: 6 guajillo chiles, 6 ancho or mulato chiles, 12 cascabel chiles (see notes)

Spice blend:
1 teaspoon oregano
1 teaspoon pepper
1/4 teaspoon cloves
1/4 teaspoon cumin
1/4 teaspoon cinnamon
1/2 teaspoon thyme
1/2 teaspoon ground all spice
1 teaspoon salt

Paste additions:
1/4 cup cider vinegar
1/2 cup chopped onion
1 medium tomato, cut into quarters (or eighths if you’re ambitious)
10 garlic cloves

3 bay leaves
1 onion
Salt to taste (I used 4 tbsp of coarse sea salt)

Notes:

I used two pounds of bone in lamb shanks and two pounds of goats meat. Both are traditional in birria, though I doubt using both is. A good chuck roast would work pretty well too. You’ll want an inexpensive cut that breaks down while braising.

I couldn’t find cascabel chiles at the local market (Global Foods, which finally came in to replace a departed Giant). So, I picked up some mulatos and pasillos. Something I like about this dish is that you can adjust the heat level pretty easily by changing your selection of chiles. Just be sure to use a combination.

Method

1. Toast the chiles

Remove the seeds from the chiles (you’ll want gloves for this if you want to touch anything sensitive later in the day) and toast them in a pan. I tossed them into the toaster oven at 350 for about 10 minutes.

2. Rehydrate the chiles

Add 2 cups of boiling water to the chiles and let sit for 20 minutes. Pati called for adding 5 cups of water to the toasted chiles and putting on a burner for 15 minutes. 2 cups of this water are used to make the paste. Fearless called for adding a cup of boiling water to the chiles. I liked the simplicity of adding boiling water to the chiles and have a nice electric kettle. I was going for more liquid and liked Fearless’s approach, so I just added 2 cups of boiling water to the chiles to rehydrate them.

3. Make the paste

Throw the chiles and their water along with the spices into a blender. I used some whole spices, so ground everything up in a retired coffee grinder. Add the vinegar, onion, tomato, and garlic gloves. Blend everything until you get a smooth puree.

4. Brown the meat.

Oven braise method: Pre-heat the oven to 350 F. Put a heavy bottomed pot or dtuch oven over medium heat. Meanwhile, cut the meat into 1” – 2” chunks. Add a tablespoon or so of oil to the pan. Once it’s shimmering (not smoking!), add the meat in a single level. You might need to do this in batches. Cook the meat until browned on several sides and remove to a bowl. Once all the meat is browned, return any meat set aside to the pot. Cover with water or low sodium stock, add the paste and bring to a light boil. Cover and put in the oven. Cook until the meat is tender and breaking down.

Slow cooker method: Put a pan suitable for browning meat (luv luv luv my cast iron pan for this) over heat. Meanwhile, cut the meat into 1” – 2” chunks. Add a tablespoon or so of oil to the pan. Once it’s shimmering (not smoking!), add the meat in a single level. You might need to do this in batches. Cook the meat until browned on several sides and put in the slow cooker. Once all the meat is browned, cover with water or low sodium stock, add the paste and put the slow cooker on high. Once the dish is up to a boil, turn the slow cooker to low and go do something useful. Come back in about 8 – 10 hours. If the meat isn’t falling off the bone tender, turn the heat back up to high and cook until ready.

Once this puppy is ready, serve over rice and have sides available. Rice, black beans, minced white onion, cilantro, salsa, and tortillas. They’re all good baby.

Bites and Pieces: The Celery Edition

Hi all,

My better half recently celebrated her 13th 29th birthday. As per usual, I make a dinner in her honor and we have a friend or two over. This night, it was just the fabulous Ms. Cox. The request was for something on the lighter side, including a chilled soup. So, I went with the idea of soup, salad, a light entree and dessert. I was supposed to make a fabulous caramel corn from Bluestem (our favorite KC restaurant), but ran out of gas. I abbreviated it by making spiced nuts and serving them with a wedge of blue cheese (Rogue is fantastic for those who haven’t tried their cheeses).

Soup was easy. I planned on asparagus, but didn’t see anything I liked, so shifted to a cucumber, mint and yogurt version (Epicurious has the link). The main was easy too. Scallops have become a favorite of ours. Just get some hot oil (clarified butter is amazing), sear them, and add to a base. I planned on a mango sauce as we had a couple that were sitting around. Too long as it happens as they’d gone rotten under the skins. A roasted tomato sauce subbed nicely.

The salad is my reason for writing this post. Etto is an Italian restaurant in DC with a starter they call Celery, Celery, Celery and Walnut. The Post recently, umm, posted their recipe. This is one that takes you to $100 per person dining at a $5 per plate cost. The ingredient list is deceptively simple: celery, Chinese celery, walnuts, cheese and dressing. The Chinese variant is typically cooked, but has a great flavor. It takes a surprising amount of time to prepare, mainly as peeling celery takes awhile. It kept clogging my Oxo peeler, but was worth the wait.

Ingredients

6 – 8 celery ribs, outer side peeled and thinly sliced (about 1 cup)

1 cup chopped celery leaves from inside of the bunch (use the rest to make stock)

1 cup chopped Chinese celery

1 ½ cups chopped Chinese celery leaves

½ cup toasted and chopped walnuts


1/3 cup olive oil (use the good stuff)

1 tablespoon fresh lemon juice

1 tablespoon fresh orange juice

½ tsp. salt

½ tsp. black pepper

2 oz. pecorino Romano cheese, shaved into curls


Method

Toss it all together and have fun. I tossed the celery and leaves, whisked together the olive oiive oil, juices, salt and pepper and tossed that all together, put onto plates and topped with cheese. It can’t hurt to reserve a few of the leaves as a garnish.

Bites & Pieces: Barks and Bostons Edition

We bought Pinta from the Daisy Hill Puppy Farm last December. Just kidding–it was Howling Hill Kennel, a local breeder of small small breed dogs (Bostons and Pugs). I appreciated the advice regarding rescue dogs from NoVA and, I think Goose. Sadly, the local links ranged as far as N. Carolina and so there were very few Bostons available in this area.

Pinta means painted or spotted in Spanish. The name fit for a Boston Terrier. She’s actually named for a rice and beans dish from Central America called Gallo Pinto (spotted rooster). As ours is a female, the appropriate name was Pinta. All we need to do is pick up a boy, who will of course be called Gallo. Well, that or Bilbo. I figure hobbit names work well for small dogs.

Pinta came home from the kennel with a bag of kibble (which we later determined is Costco’s small breed dog food). We had been feeding her that for the first 7 months we had her along with treats. Then we went to Costa Rica for several weeks. A friend of ours cared for her until I returned. As part of caring for Pinta, she fed her a canned dog food to keep her happy. I returned on my own for four weeks. There were a number of containers left, so I took to giving Pinta a bit in the morning when I left and a bit more in the evening when I came back home. Then I ran out…

What to do? I didn’t want to buy a bunch of expensive dog food and it struck me that it’s something one could make. I hit the web and looked through a few recipes. This was going to be a supplement to her main diet, so I wasn’t worried about making a complete food. Just something that would be a bit of a treat when I left in the morning, but one that is nutritionally appropriate.

It takes a couple of hours to make, but there’s not much active work and one batch makes enough to last for a couple of months. The essentials are meat, rice, and veggies. I went with chicken for the meat. Chicken quarters are inexpensive and the bones are useful for making stock. I suppose I could break down whole chickens and save the breast meat for human food.

I got mixed messages regarding rice. Brown rice is good, because it has additional nutrients. No no no. Brown is bad, because it’s harder to digest. I split the difference in the end. I used a sweet brown rice (the bag your own bin at Whole Foods), but I cook it an extra step. I’m a fan of risotto, so I thought that might work. I cook the rice in our rice cooker and then cook it further with chicken stock so that it gets a risotto like texture. For veggies, I use carrots and peas. Onions are verboten as they can be toxic to dogs. I don’t use a commercial stock as onions are certain to be used and I’d rather not deal with doggie indigestion.Although this isn’t our dog’s primary food, I add a vitamin supplement and some Omega 3 oil. Once everything is mixed together, I freeze it in one cup portions. I can transfer one down to the fridge in the evening and it’ll be defrosted by morning. On days when she’s alone, I give Pinta about 1/3 cup when I leave in the morning and a similar amount in the evening.

The basic approach works pretty well with other proteins. I was cooking salmon recently and had some trimmings after I made filets. That made a nice small batch of Pinta food. Likewise, I had a chuck roast that I used for a Trieste goulash. Grind the smaller pieces and use them for a beef based version of this dish.

Ingredients

Five pound bag of chicken leg and thigh quarters

Two cups chopped or shredded carrots

One pound bag of frozen peas, defrosted

Two cups of sweet brown rice

Nutritional supplements

Method

1. Cook rice. I put rice and three cups of water in a rice cooker and let the machine do the work.

2.  Remove skin from chicken quarters and separate meat from bone. Make stock from the bones, ~6 cups of water, several stalks of celery and a couple of carrots. Do not use onions as these are slightly toxic to dogs. Bring up to a boil and simmer, uncovered, for about an hour. You should get about four cups of stock. Strain and return to pot.

3. Use a meat grinder or food processor to make ground chicken. If using a food processor, cut the chicken into large pieces (1” – 2”) and put in freezer for 15 minutes. This is a method I use for ground beef (taken from Cooks Illustrated).

4. Add a bit of oil to a large, heavy bottomed pot and heat slightly. Add the ground chicken and cook, stirring occasionally, for a few minutes. No need to cook it completely, just take an edge off the rawness. Add the carrots and peas, stir and add a couple cups of hot broth. It’s not a bad idea to defrost the peas in the microwave and chop in the food processor.

5. When the rice is done, add to the pot with the remaining two cups of broth. Simmer until the broth is absorbed. You’re going for a risotto like consistency. I read conflicting information about digesting brown rice, so decided to break it down further. Whole Foods has sweet brown rice, which is short grain and hence suitable for this kind of dish.

6. Add the softened rice to the chicken and vegetables and stir. Cook uncovered until the broth is mostly absorbed. Stir in nutritional supplement. These vary quite a bit, so use your judgement as to the right amount. I use a combination of a NutriVet and Omega 3 oils.

This makes about four quarts of dog food. I freeze in one cup quantities. Move to the refrigerator the day before and it defrosts nicely. I reheat to room temperature in the microwave before serving.

Pinta at 3 Weeks

Image

Pinta at 6 Months

Image

Pinta at 1 Year

Image

Bites & Pieces: A Postcard from Costa Rica

I arrived in Costa Rica on Monday night after far too long an absence from my favorite home away from home. We started taking our sons their for a month in the summertime a few years ago. I was going to be away at a conference and my better half (Keen) was offered work out of town that overlapped my conference. Rather than give up on work at a slow time and lacking a kennel in which to put the boys, we worked out something else. I flew down to Costa Rica with them, dropped them off with their grandmother, and flew back to DC before going on to my conference. Keen flew down after finishing her assignment and spent the rest of August. It worked out so well, that they’ve spent 4 – 6 weeks in Costa Rica every summer since then. In honor of our annual trip, I thought I’d post a few of my favorites that I associate with Costa Rica, one way or another.

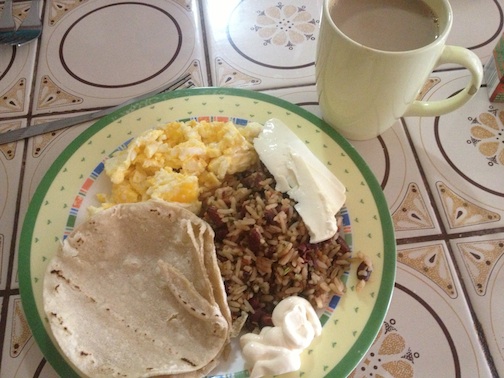
Breakfast – Gallo Pinto

Every country in Central America claims to have invented Gallo Pinto, but the Ticos do it best. I say this with absolute confidence, never having visited Guatemala, Honduras, El Salvador, Nicaragua, or Panama (and let’s not forget Belize). My confidence in Costa Rican Gallo Pinto is that I can’t imagine having it without Salsa Lizano. It’s the same general class of condiment as steak sauce in the US and relish in the UK (Worcestershire sauce is one of many). It’s rice and beans with a twist.

Ingredients

1/4 cup of vegetable oil
2 cups of white rice, cooked
2 cups, black beans, cooked (or 1 can, drained)
1 medium onion, minced
2 cloves garlic, minced
1 carrot, (you guessed it) minced
1 bell pepper, (and wait for it) minced
Salsa Lizano or other seasoning, to taste

optional: cilantro leaves or diced tomato for garnish

Method

Heat oil in a heavy frying pan and add the minced veggies. Cook until soft and then add the rice. Stir for a bit until warmed and mixed with the veggies, then add the black beans. Season well with Salsa Lizano. I like to let it cooked unstirred for a bit to build up a crust on the bottom or just cook and stir until hot. This is a staple of Costa Rican kitchens, usually served at breakfast with tortillas, queso duro (hard cheese) and scrambled eggs. Garnish with cilantro leaves or some diced tomato if you like. It’s great with some mango or papaya on the side.

Lunch – Ceviche

Peruvians hold claim to this sushi from the south and you can usually get the best ceviche at a restaurant run by Peruvians. I had my first taste of ceviche at a little joint near Manuel Antonio, a national park on the Pacific coast. The basic concept is simplicity itself. Cut up fresh fish into rough dice–dorado (mahi-mahi) and corvina (sea bass) and cover with lime juice. The juice “cooks” the fish, firming it up as if it had been cooked with heat. The acid should also kill off various beasties, but this is not the same as cooking, so you need to use high quality fish. Make sure it’s sushi grade for salmon unless you want to risk a tapeworm. After a period varying from a few minutes to hours (depending upon the fish and how you like it), drain and toss with minced onion, tomato, possibly some chiles, and cilantro. Serve with tortilla chips and, if you’re Costa Rican, salsa rosada. This “rose sauce” is a mixture of ketchup and mayo, but we like to use plain yogurt instead. Tangy and tasty.

I’ll add a pair of recipes from a book on ceviche that was given to me by a friend. Guillermo Pernot, the author, was the chef-owner of ¡Pasion! in Philadelphia (since closed) and now is the concept chef of the Cuba Libre restaurants. The first of these combines whole bay scallops with a blackened tomatillo salsa and truffel oil. Indulgent and a favorite of mine for parties. The second recipe combines sea scallops with grapefruit for a colorful presentation. Make sure to use high quality scallops; wet pack won’t do.

Bay Scallop Ceviche with Truffle Tomatillo Salsa

1 pound fresh, untreated bay scallops or sea scallops, trimmed and quartered
1 cup fresh lime juice
1/4 cup fresh orange juice
3 tablespoons finely diced red
2 tablespoons finely diced serrano chilies (specialty Latin
1 tablespoon kosher salt

3 tablespoons extra virgin olive oil
1/2 pound fresh tomatillos, husks removed, rinsed
1/2 pound ripe plum tomatoes
1 red onion, quartered and unpeeled
1 jalapeno chili
4 cachucha chilies
1 bunch fresh cilantro leaves
1/2 cup fresh lime juice
3 tablespoons truffle oil
Kosher salt and freshly ground black pepper, to taste

2 tablespoons crushed platano chips (recipe follows)
12 whole platano chips

1. Combine the lime juice, orange juice, onion, serrano chilies and salt. Add the bay scallops and toss to combine. Cover and refrigerate for 24 hours.

2. In a large saute pan, heat 1 tablespoon of the olive oil over moderately high heat. Add the tomatillos, tomatoes, onion, and chiles. Cachucha chiles look like habañeros, but without so much heat. You can use a couple more jalapeños instead. I often toss all the ingredients with oil and broil them in the toaster oven. Works about the same. Let the blackened veggies cool and stir in the cilantro. Pulse in a food processor until chopped, but chunky. Pernot likes to use a meat grinder for a different texture. Combine the vegetable mixture with the lime juice, truffle oil, remaining 2 tablespoons olive oil, salt and pepper. Taste for seasoning, cover and refrigerate for up to 1 day.

3. Put it all together. Drain and discard the liquid marinade. In a medium bowl, combine the marinated scallops with most of the blackened tomatillo-truffle sauce. Cover and refrigerate 20 minutes to marinate. When ready to serve, drain the scallops of excess liquid, and toss with the remaining blackened tomatillo-truffle sauce. Adjust the seasoning, adding salt and pepper if necessary. Divide the ceviche among soup spoons laid on a platter. Sprinkle with crushed plantain chips just before serving, accompanied by bowls of plantain chips.

You can make plantain chips on your own by frying planks of green plantains in oil and draining on paper towels. Or just buy a bag of them.

Sea Scallop Ceviche with Grapefruit and Radishes

1/2 pound of sea scallops, cut into two rounds each
3/4 cup of ceviche marinade
2 ruby grapefruit
6 red radishes
1 lime, juiced (about 2 tablespoons(
pinch hot pepper flakes
1/2 tsp. kosher salt
1 tablespoon chiffonade of basil (regular or Thai)
1 tablespoon chiffonade of mint

Combine the scallops with the marinade and refrigerate for 30 minutes. Slice away the skin and membranes from the grapefruit and set aside. Combine the lime juice, pepper flakes (if using), salt, and herbs. Thinly slice the radishes and add half the juice/herb mixture. Drain the scallops of the marinade and add the remaining juice & herbs. Divide the scallop rounds into four plates. Place the grapefruit segments around the outside and a pile of radish juliennes in the center.

Marinade for Ceviche

1/2 cup fresh lime juice
1/4 cup fresh orange juice
2 tsp. kosher salt

Afternoon – Bebidas

I’m sure you’re a bit thirsty from that walk along the beach and could use something refreshing. I would suggest jugo en leche (mango or papaya, blended with milk) or pipa for non-alcoholic drinks. For the latter, grab a green coconut, whack off the top with a machete, and stick a straw in it. Lacking a green coconut or a machete, you can always pick up some coconut water at the market. It also makes a great piña colada. Use the coconut water instead of that stuff in a can, blend with fresh pineapple and rum and enjoy. As long as we’re discussing alcoholic beverages, I might suggest a nice, cold Imperial (which you can sometimes find in the US) or a Cuba Libre (rum and coke with lime juice).

Dinner – Black Bean Risotto

Let’s head over to the other side of Costa Rica, also known as the Mosquito Coast. Many Caribbean workers came to Costa Rica to build the railway between San José and Limón, on the Caribbean coast. Many stayed, giving that coast a distinct cultural and culinary flavor. We spent our honeymoon in Punta Cocles, about two hours south of Limón and just north of the Panamanian border. It was the worst road I’d ever driven. At times, it seemed there were more potholes than highway. Once you get there, it’s worth the drive. We hung out and had a lot of good food. One dish that stood out for me was the Caribbean style rice and beans. It’s made with coconut milk and served with chilero, a spicy vegetable mix of bell pepper, carrot rounds, and hot peppers (habañeros), all steeped in vinegar. Some time later, I had the idea of making a risotto with black beans and used this dish as my inspiration.

Ingredients

Brodo
4 cups chicken stock
1 cup coconut milk (2/3 of a can)
½ cup dry white wine (or more broth)

Soffritto
2 tablespoons butter
1 tablespoon vegetable oil
1/3 cup finely minced onion

Riso
1 ½ cups short grain rice (Arborio or Carnoli, though sushi rice works well)
1 ½ cups cooked black beans or 1 can, drained and rinsed

Condimenti
½ cup coconut milk (1/3 can)
½ bunch cilantro, washed, thick stems removed, chopped to make about ¼ cup
Queso duro or fresco, crumbled for garnish

Method

1. Bring broth to a steady simmer in a saucepan on the stove. Add coconut milk and return to simmer.
2. Heat the butter and oil in a heavy casserole or dutch oven over med. heat. Add the onion and sauté for 1 to 2 minutes until it softens.
3. Add the rice to the soffrito, stir using a wooden spoon until the grains are thoroughly coated. Add the wine and stir until it is completely absorbed. Add the simmering broth, ½ cup at a time. Stir frequently until almost completely absorbed and add the next ½ cup.
4. Add coconut milk and cilantro and remove from heat. Stir completely to combine with the rice. Add the black beans near the end of cooking.
5. Put the risotto on serving dishes. Sprinkle with crumbled queso. Top with chilero or serve on the side. This dish is also good when topped with grilled shrimp or fresh mango.

Serves 4.

Chilero

8 chiles, preferably Scotch bonnet or Habañero
1 large onion, yellow or sweet (Vidalia)
1 large or several small carrots
1 red bell pepper
Cider or white vinegar

Cut the onion and bell pepper into 1/2″ chunks. Peel the carrot(s) and slice into rounds. Wearing gloves, cut the chiles in half and remove the seeds. Toss all vegetables and put in a large mason jar. Fill to the top with vinegar. I like cider vinegar for this recipe, but white vinegar should do as well. White wine vinegar might work, but isn’t really needed. Let sit for at least a week.
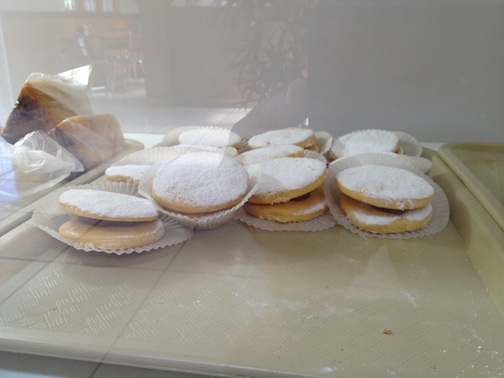
Dessert – Alfajores

These cookies are a favorite indulgence of mine. It’s two small sugar cookies with dulce de leche in the center and topped with powdered sugar. The cookies are made with cornstarch instead of flour and so are quite soft. They’re great with coffee, preferably Costa Rican of course.

Ingredients

1 1/2 sticks butter (3/4 cup)
1 cup sugar
1 egg
2 egg yolks
2 1/2 cups cornstarch
1 cups all-purpose flour
1 tsp. vanilla extract
1/2 tsp. baking powder
Zest of 1/2 lemon
Dulce de Leche

Method

Cream the butter and sugar together. Add the remaining ingredients except the dulce de leche and coconut and mix well. Turn onto a floured work surface and knead until the dough is smooth. Let the dough rest for 15 minutes.

Roll the dough out to a thickness of about 1/4 inch and cut into 2-inch rounds. Place on a greased cookie sheet and bake in a preheated 300°F oven for 20 minutes. When cool, spread some dulce de leche on the bottom of half the cookies and make a sandwich with the remaining cookies. Squeeze the sandwiches so that some of the dulce de leche is squeezed out the sides, and roll the sides in the grated coconut. Makes about 12 cookie sandwiches. Dust with powdered sugar.

Gallo Pinto2

alfajores

Bites and Pieces: Eat Your Sprouts

Brussels sprouts have a well-deserved reputation amongst children for being one of the nastier things they’re forced to choke down. They manage to combine insipid flavor with a mealy texture. You can imagine my surprise when my wife came back from a trip gushing over these amazing Brussels sprouts she’d had. She went to a place in Kansas City called PizzaBella. They roast Brussels sprouts with pancetta, cranberries, almonds, and vinaigrette. Looks a lot more appetizing than cream of Brussels sprouts, no?

Creamed Brussels Sprouts

Creamed Brussels Sprouts

PizzaBella Brussels SProuts

Sprouts from Pizza Bella

Brussels sprouts have been a fixture in our household ever since. You can find plenty of recipes out there for roasted Brussels sprouts. Here’s an example from the good folks at Epicurious (originally published in Gourmet magazine).

Roasted Brussels Sprouts

Ingredients

1 pound of Brussels sprouts, halved

2 oz. of diced pancetta

1 garlic clove, minced

½ tablespoon olive oil

salt and pepper to taste

Method

Combine everything and spread in a single layer in a baking pan. Roast in 450 degree oven, stirring after about ten minutes, until sprouts are browned on the edges and tender. Add a bit of water to the pan when done to get the brown bits . Serve warm.

Not bad. One could add the cranberries and almonds and get reasonably close to that served up by PizzaBella. I find a bit of sweetness works well in this sort of dish, so some pomegranate juice adds a nice touch. Still, one isn’t going to approach what you get from a good pizza oven at home. I wanted proper caramelization and wasn’t going to get that from the oven alone.

Enter my cast iron pan. If I want a good steak, I sear it on both sides and put it in the oven until it’s medium rare. [If I want a great steak, I’ll put it in a low temperature oven until medium rare and then sear it.] So, I sear the cut sides of the Brussels sprouts, toss in the other goodies, and then finish in the oven. It’s a pain to halve and place the Brussels sprouts, but the center gets pretty mealy by the time whole sprouts are cooked.

Caramelized Brussels Sprouts with Almonds, Cranberries, and Pomegranate

Ingredients

1 pound of Brussels sprouts, halved

¼ cup of olive oil

¼ cup of slivered almonds

¼ cup of sweetened, dried cranberries (Craisins)

½ cup of pomegranate juice

salt and pepper to taste

Method

Heat the oven to 400 degrees. Put a case iron skillet over med-high heat and add olive oil. When the olive oil is shimmering (not smoking), add the Brussels sprouts, cut side down. Cook until they develop a good brown crust, several minutes. Add the cranberries and almonds (if using) and use a metal spatula to get the Brussels sprouts off the pan and mix briefly. Pour in the pomegranate juice and put into the oven until the sprouts are just cooked through. Serve with a bit of grated Parmesan cheese.

Some variation on this has been my go to dish until recently, when I started playing with unusual ingredients for different cuisines. I tried my braised squid concept, using an Indian recipe for chicken with tomatoes, yogurt, ginger, garlic and the usual spices. We had a big bag of Brussels sprouts in the kitchen and I decided to try cooking them with an Indian flare. And so here we have it.

Curried Brussels Sprouts

Ingredients

½ pound of Brussels sprouts, halved

¼ cup of ghee (I used two tablespoons each of clarified butter and canola oil)

½ cup chopped onions

1 teaspoon minced ginger

1 teaspoon minced garlic

¼ teaspoon red chili powder

½ teaspoon ground coriander

½ teaspoon ground cumin

½ teaspoon ginger powder

1 teaspoon ground cinnamon

Method

Heat the oven to 400 degrees. Put a cast iron skillet over med high heat. Add the ghee until shimmering. Add the onions and cook until browned. Add the ginger, garlic and spices and cook until the fat begins to separate. You might need to add a bit of water, a technique known as bhunao.

Place the Brussels sprouts, cut side down, and cook for several minutes. Scrape the Brussels sprouts from the bottom of the pan with a metal spatula and toss slightly. Put the pan in the oven and cook until the sprouts are tender, about ten minutes. I’ll post a separate B&P update for the curried squid with coconut/saffron rice.

Since starting this post, I tried a third variation. The first two are good, but go into the category of anything tastes good if you add enough butter. I wanted to make sprouts that might be a bit healthier. Well, that and I was out of butter. But I did have cheese! I also had some leftover sliced and spiced apples from an apple pie that I’d made. As a slice of cheddar cheese is a classic topping for apple pie, I had my inspiration.

 Brussels Sprouts with Apples and Cheese

Sprouts no cheese Sprouts and Cheese
Ingredients

½ pound of Brussels sprouts, halved

2 tablespoons of vegetable oil (I used canola)

1 Granny Smith apple

1 tablespoon sugar

½ teaspoon cinnamon

¼ teaspoon ginger

¼ teaspoon allspice

Optional: ½ cup of grated cheddar cheese

Method

Peel and slice the apple, then toss with sugar and spices. Set aside.

Heat the oven to 400 degrees. Put a case iron skillet over med-high heat and add vegetable oil. When the oil is shimmering, add the Brussels sprouts, cut side down. Cook until they develop a good brown crust, several minutes. Add the sliced apples and use a metal spatula to toss everything together. Put into the oven for ten minutes.

Optional: After five minutes, sprinkle shredded cheese over the sprouts and apples and return pan to oven for another five minutes.

Note: use whatever combination of spices you prefer for apple pie. I actually used some leftover sliced apples from an apple pie. I had tossed the apples with lime juice to prevent them from darkening until I assembled the pie. You can also toss in some minced ginger and garlic if you like.

∂ß

Bites and Pieces: The Book

Hi all,

I was searching through some old comment threads to track down a particular response of Scott’s awhile ago. In the course of doing that, I saw a lot of interesting Bites & Pieces posts. Some of which I’d completely forgotten about.

I was thinking about going through them and compiling the Bites & Pieces into one record for ATiMers, past and present. Perhaps an exercise for when I’m in Sequesterville. We are forbidden by law from doing anything work related while on furlough, so I may as well make some use of my time.

∂ß

Bites & Pieces: Slow Squid

Squid has a lot going for it. The species grows rapidly and so is considered sustainable. It’s high in protein and low in fat. Well, at least until you bread it, deep fry it, and serve it with marinara sauce. As bar food goes, it’s a favorite of mine. The Carlyle in Shirlington has a particularly good version. My mother always has it when visiting town. One of the most interesting squid dishes I had was at the Green Street Grill in Cambridge, MA. It was made Provencal style with garlic and tomatoes. It was an eye opener and one of my favorite ways to make squid.

I wanted to do something different with the squid I bought at my favorite waterfront fish monger on Friday (Captain White’s). Squid can be tricky to cook as if you cook it for more than a minute or two, you may as well serve up a plate of rubber bands. There are various strategies to tenderize it, but it comes down to a fast cook. Turns out that squid shares a characteristics with some of my favorite cuts of beef. You can cook it fast, but you can also cook it slow. In the case of beef, the collagen gradually breaks down and a tough cut of meat becomes melt in your mouth tender. That didn’t happen with the squid, but it was tender and the recipe is easy enough for a weeknight meal.

I slightly adapted a recipe originally published in Gourmet, which can be found on the Epicurious web site.. NPR also has a story on slow cooked squid with some recipes that I plan to investigate in the near future.

The dish has a flavor I’ve never gotten out of squid before. I love linguini with clams or mussels for the flavor one gets out of the shellfish, but don’t really care for the meat. We served the dish over black rice. It’d be good with linguini as well. I think that one could add fennel or another root vegetable to the dish.

I adapted the Epicurious recipe slightly. The original recipe calls for cooking just the garlic and parsley, then adding the squid. I decided to cook some chopped onions with the parsley and then add the garlic. I used a can of chopped tomatoes; they suggested using whole tomatoes and chopping them. The original recipe calls for adding ¾ of a cup of wine and ¼ cup of water after adding the squid and simmering for 10 minutes to reduce the liquid. Then, add the tomatoes and simmer on the stove top for 45 minutes, stirring occasionally. I wanted to make this a simple dish, so I added the wine and tomatoes together, brought it up to a simmer, and then braised the dish in the oven.

[Edit: I forgot that I added a teaspoon or two of capers to the dish as I thought they would fit and, well, I love capers.]

I had two half pound squid bodies rather than the pound and a half, but it was plenty for us. I cut them up into half inch squares, then rinsed, dried and coated them with olive oil. I thought that would give me more even cooking at the onset. They were about a quarter inch thick, so made good meaty bites. This would work well with smaller squid and I would encourage you to use the tentacles. Octopus might be good in this dish as well.

Ingredients

1 ½ pounds of squid, cleaned
1/4 cup minced onions or shallots
1 bunch of parsley, finely chopped
1 cloves of garlic, finely chopped
¼ teaspoon of red pepper flakes (optional or use to taste)
½ cup of dry white wine
28 oz. can of chopped tomatoes

Method

Cut the squid bodies into pieces or rings. Combine with tentacles if you have them. Rinse and dry, then toss with olive oil to coat.

Once the squid is ready, it’s a good time to turn on the oven. I set mine at 350 degrees, but would probably use a lower temperature (perhaps 300) the next time.

Reserve 2 tablespoon of chopped parsley for garnish (which I forgot to use).

Heat about 2 tablespoons of olive oil in a heavy pot or dutch oven. Add the chopped onion and parsley and stir for a minute. Add garlic and stir for another minute. Create a small open space, pour in a little olive oil, and add the red chile flakes. Mix everything together and add the squid. Cook for a minute or two and then add the wine and tomatoes. Bring to a simmer over medium heat and then throw into the oven, uncovered. Cook until the water evaporates, about 45 minutes to an hour.

Remove from the oven and serve over pasta or rice. Garnish with parsley.

BB

Bites and Pieces: West African Edition

I hosted a wine dinner on Saturday. It was a bit too ambitious in that I picked 7 fishes as the theme, from the Italian tradition, and also did dishes from 7 . I cheated a bit on Antarctica—frozen yogurt. The trickiest one for planning was Africa. I know relatively little about African cooking (except Ethiopia). Fortunately, my wife went to West Africa (Mali) for her stint in the Peace Corps and knew exactly what to do. Yassa.

Yassa is a Senegalese dish, traditionally served with chicken (Poulet en Yassa). It also works very well with grilled fish. I tried it with swordfish, which was a good finish to the meal. The key ingredients are onions, lemon juice and peanut oil. One traditionally marinades the meat in the ingredients, but I think separating it works.

Ingredients

1 – 2 pounds of swordfish, cubed*

½ cup of peanut oil


Yassa Sauce

4 – 6 yellow onions, sliced

½ cup of lemon juice

½ cup of cider vinegar

1 tablespoon minced garlic

2 tablespoons mustard

1 tablespoon soy sauce (Maggi is traditional; soy works fine)

1 minced chili pepper (optional)

Pepper and salt to taste

  1. Combine all ingredients and let rest for at least 2 hours
  2. Cube the swordfish and set aside. If you have a favored preparation, go for it. A bit of salt, pepper, cumin and turmeric works with the flavors of this dish. Have fun!
  3. Heat the peanut oil in a large, heavy bottomed pan or dutch oven. Drain the onions, setting aside the marinade, and add to the pan. Cook over medium heat until softened (and possibly browned a bit). Add the reserved marinade and bring to a boil. Cook until the onions form a sauce
  4. Cook the fish however you like. I planned to grill it, but the coals had gone mostly dark by the time I was ready to cook the fish. I heated up a couple of tablespoons of peanut oil in a pan and seared it, then added the sauce.
  5. Combine the fish and sauce. Warm to combine. Serve over rice. 

*For those who have concerns about the mercury content of swordfish, the dish is made traditionally with sea bass (Poisson Yassa). Chicken breast or pork loin would also work.